SSH Access Management - Control SSH Access With Vault OTP Engine (PART 1)
by Ananth Kamath, System Analyst
In this blog series you will go through the problem involved with SSH Access Management and how to fix the same without compromising your organisations security and compliance using Hashicorp's Vault and Bastion server.
SSH access management is a known problem in DevOps world today. It is a tedious job to create access for your team on demand and then ensure that the access is revoked post their task. To simplify this task you end up creating your application workloads(servers) in the public subnets, sharing pem files or copying users public key into the workloads themselves. Thereby risking exposure of your critical application or user data to the world.
Let Us Address The Elephant In The Room
Generally, you would provide your users access to the application workloads via Bastion/jump server and keep all our workloads in a private subnet hidden from the rest of the world. By doing this you can restrict access for the external users and the attackers to your workloads, but you would still need to take care of access and audit-ability of your organisation's internal users.
Controlling access to the bastion server and logging the access requests for auditing are critical for your organisation's security and compliance goals. There are multiple authorities with packages to help you achieve this, one such authority is Hashicorp's Vault. Vault helps you control access to the bastion server and also provides audit logs for the access requests.
Implementation

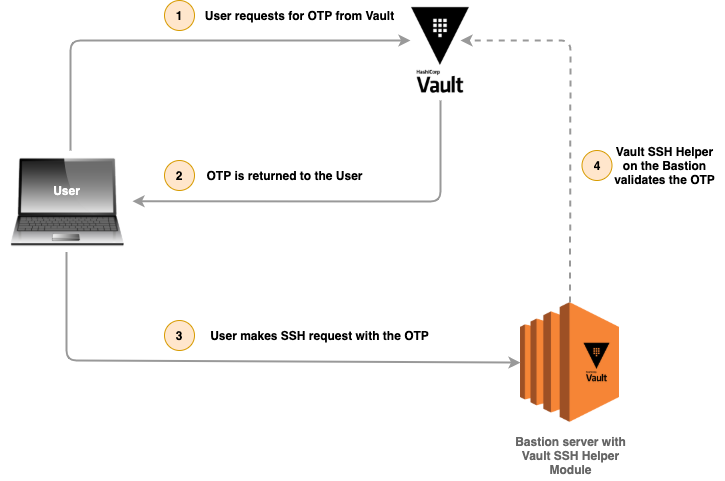
We will be using two EC2 instances, one for setting up the Vault server and the other as the bastion server in the public subnet. Users will interact with the Vault server via Vault CLI to fetch the OTP(One Time Password) and then SSH to the bastion server using the OTP as the password.
The implementation includes 4 steps
- Setup Vault server
- Enable SSH OTP engine on Vault server
- Setup Bastion Server with SSH helper
- Setup Vault client for user access
Setup Vault Server
Let us start by setting up the Vault server on an EC2 instance. We will be using the Ubuntu AMI to spin up the EC2 instance.
-
Download & Install Vault Server
# Download Vault binary based on the version, replace ${VAULT_VERSION} with required version below $ wget https://releases.hashicorp.com/vault/${VAULT_VERSION}/vault_${VAULT_VERSION}_linux_amd64.zip -O vault.zip # Unzip the Vault zip file $ unzip vault.zip # Make Vault executable and accessible $ chmod +x vault $ sudo mv vault /usr/local/bin/vault # Set Linux capability flag on the binary, this will let the binary do memory locking without granting unnecessary #privileges $ sudo setcap cap_ipc_lock=+ep /usr/local/bin/vault # To check if vault is installed $ vault --version vault v1.3.1 # To install command line completion $ vault -autocomplete-install # Create a vault system user sudo useradd --system --home /etc/vault.d --shell /bin/false vault # Create vault service file sudo touch /etc/systemd/system/vault.service # Update /etc/systemd/system/vault.service with below content [Unit] Description="HashiCorp Vault - A tool for managing secrets" Documentation=https://www.vaultproject.io/docs/ Requires=network-online.target After=network-online.target ConditionFileNotEmpty=/etc/vault.d/vault.hcl StartLimitIntervalSec=60 StartLimitBurst=3 [Service] User=vault Group=vault ProtectSystem=full ProtectHome=read-only PrivateTmp=yes PrivateDevices=yes SecureBits=keep-caps AmbientCapabilities=CAP_IPC_LOCK Capabilities=CAP_IPC_LOCK+ep CapabilityBoundingSet=CAP_SYSLOG CAP_IPC_LOCK NoNewPrivileges=yes ExecStart=/usr/local/bin/vault server -config=/etc/vault.d/vault.hcl ExecReload=/bin/kill --signal HUP $MAINPID KillMode=process KillSignal=SIGINT Restart=on-failure RestartSec=5 TimeoutStopSec=30 StartLimitInterval=60 StartLimitIntervalSec=60 StartLimitBurst=3 LimitNOFILE=65536 LimitMEMLOCK=infinity [Install] WantedBy=multi-user.target -
Setup Vault Server
Provide
vaultuser access to/etc/vault.dsudo mkdir /etc/vault.d sudo touch /etc/vault.d/vault.hcl sudo chown --recursive vault:vault /etc/vault.d sudo chmod 640 /etc/vault.d/vault.hclVault stores the data in its storage in an encrypted format. There are multiple types of storage supported by Vault. We will be using the
Filesystemas storage for the demonstration. On a production server though, it is recommended to use a highly available key value store like etcd, Consul, etc. Let's update the file/etc/vault.d/vault.hclwith the values below:storage "file" { path = "/mnt/vault/data" } listener "tcp" { address = "0.0.0.0:8200" tls_disable = 1 } ui = true log_level = "Info"Provide
vaultuser permission to/mnt/vaultdirectory# Create /mnt/vault $ sudo mkdir /mnt/vault # Give vault permission to the directory $ sudo chown -R vault:vault /mnt/vault -
Initialise Vault Server
Vault server always boots up in sealed state, data in its storage is stored in an encrypted format. Vault is configured to know how to access the physical storage and its location, but doesn't know how to decrypt any of it. Unsealing is the process of constructing the master key necessary to read the decryption key to decrypt the data.
When you initialise the Vault for the first time you will be given a set of 5 keys. To unseal Vault, you will need at least 3 of these. You will also be provided a root token which will be used later to login to the vault and create required users, groups and policies. The number of keys to create master key and threshold of unseal keys are configurable, they are set to 5 and 3 by default.
Every time the vault is restarted or if the underlying EC2 instance gets restarted the vault goes back to sealed state and will have to be unlocked by using at least 3 of the 5 keys provided during the initialisation step. To avoid this manual effort you can use AWS KMS to Auto Unseal Vault. (We will be writing a detailed blog on this soon)
Let's initialise the vault server now, these keys and token are displayed only once on initialisation so keep them somewhere safe. You would not be able to unseal vault later if you lose the keys.
# Now start the vault server as a service
$ sudo systemctl enable vault # Enable vault to start automatically when the system boots up
$ sudo systemctl start vault
$ sudo systemctl status vault

# Initialise the Vault server this will return root token and 5 keys used to unseal
$ export VAULT_ADDR="http://127.0.0.1:8200"
$ vault operator init >> ~/vault.keys

Initial Root Token: s.######

Unseal Key 1: key1###
Unseal Key 2: key2###
Unseal Key 3: key3###
Unseal Key 4: key4###
Unseal Key 5: key5###
Now the vault server setup is complete and is ready for use.
Enable SSH OTP Engine On Vault
Now that the vault server is initialised, we can access it over http://{{VaultEC2PublicIP}}:8200. Let's go ahead and enable the SSH OTP engine on Vault. Follow below steps to accomplish the same.
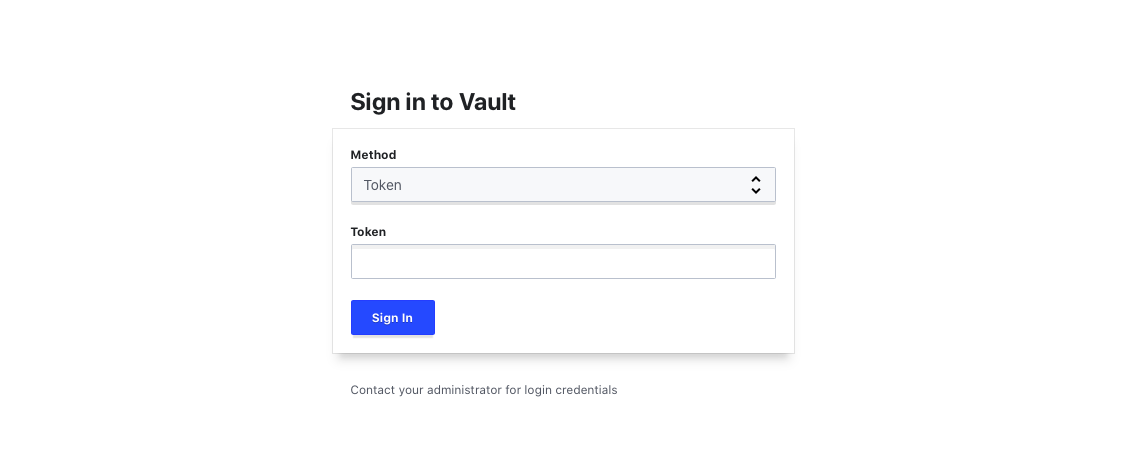
- Log in to the vault using the root token obtained on initialisation

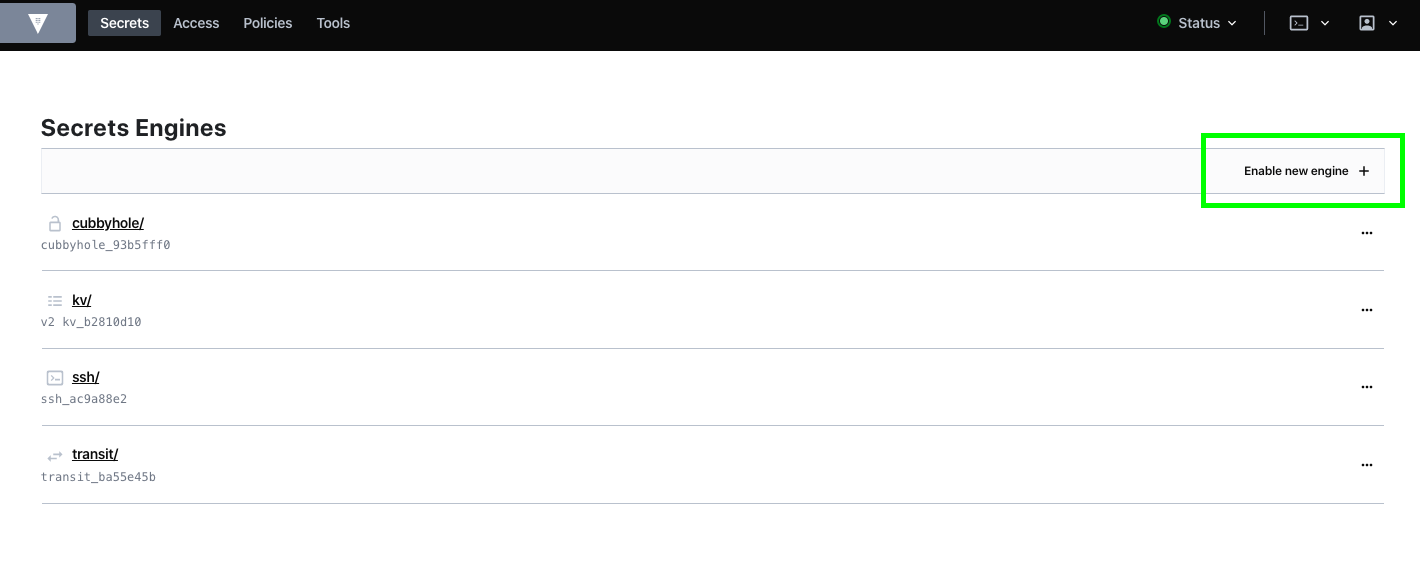
- Click on enable engine, to enable SSH engine

- Choose SSH engine, proceed further

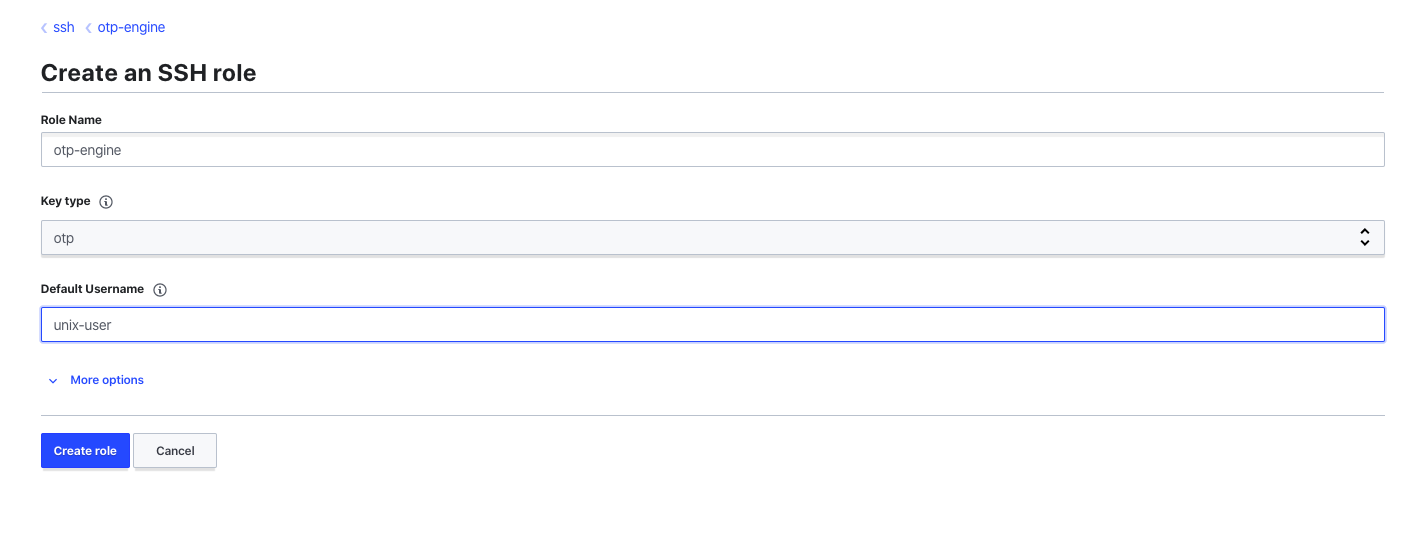
- Create a role with any name, but select OTP as the type

Once this step is complete, you now have the Vault server enabled with SSH OTP engine ready to use.
What Next?
As discussed earlier the implementation includes 4 steps, we have covered just two of those four steps in this blog. Part 2 of this blog series will cover:
- How to setup the bastion host to communicate with the SSH OTP engine enabled on the Vault server?
- How can users request for the OTP from the Vault server?